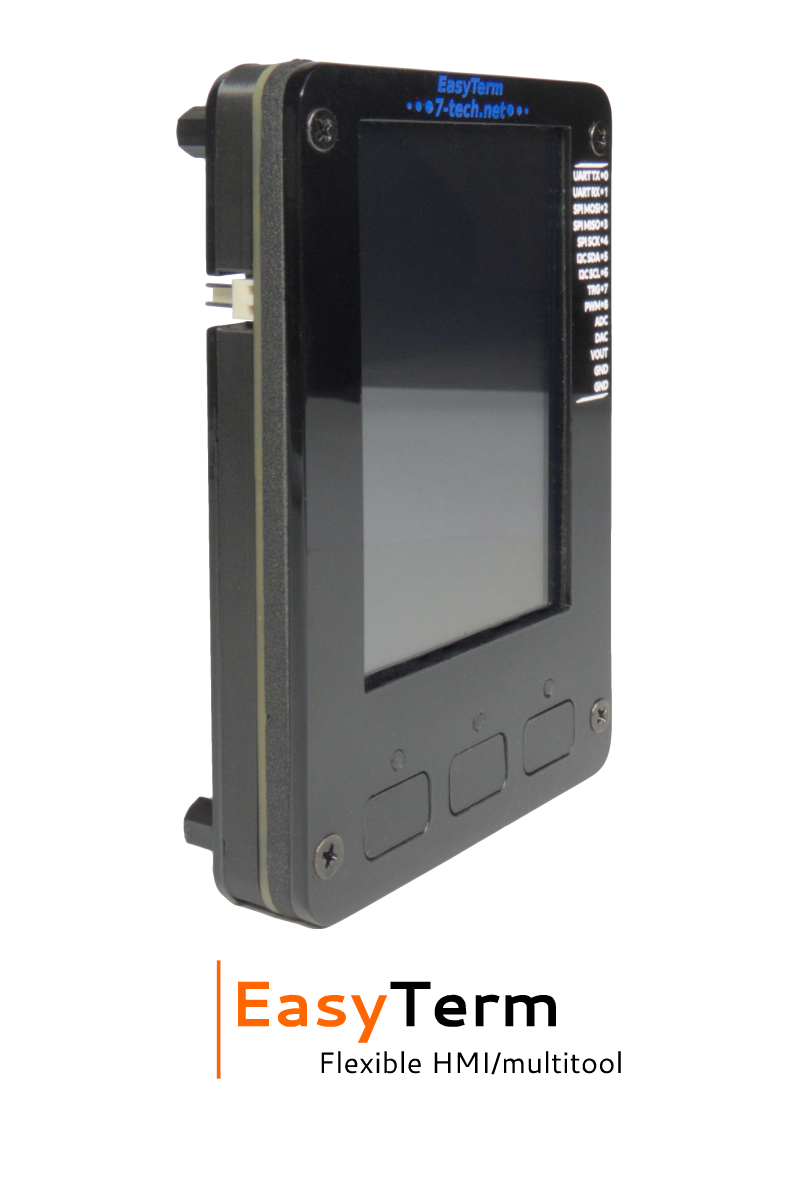
Five years of development, countless updates, improvements, and plans – all driven by one big vision: to make EasyTerm one of the most flexible tools in the world.
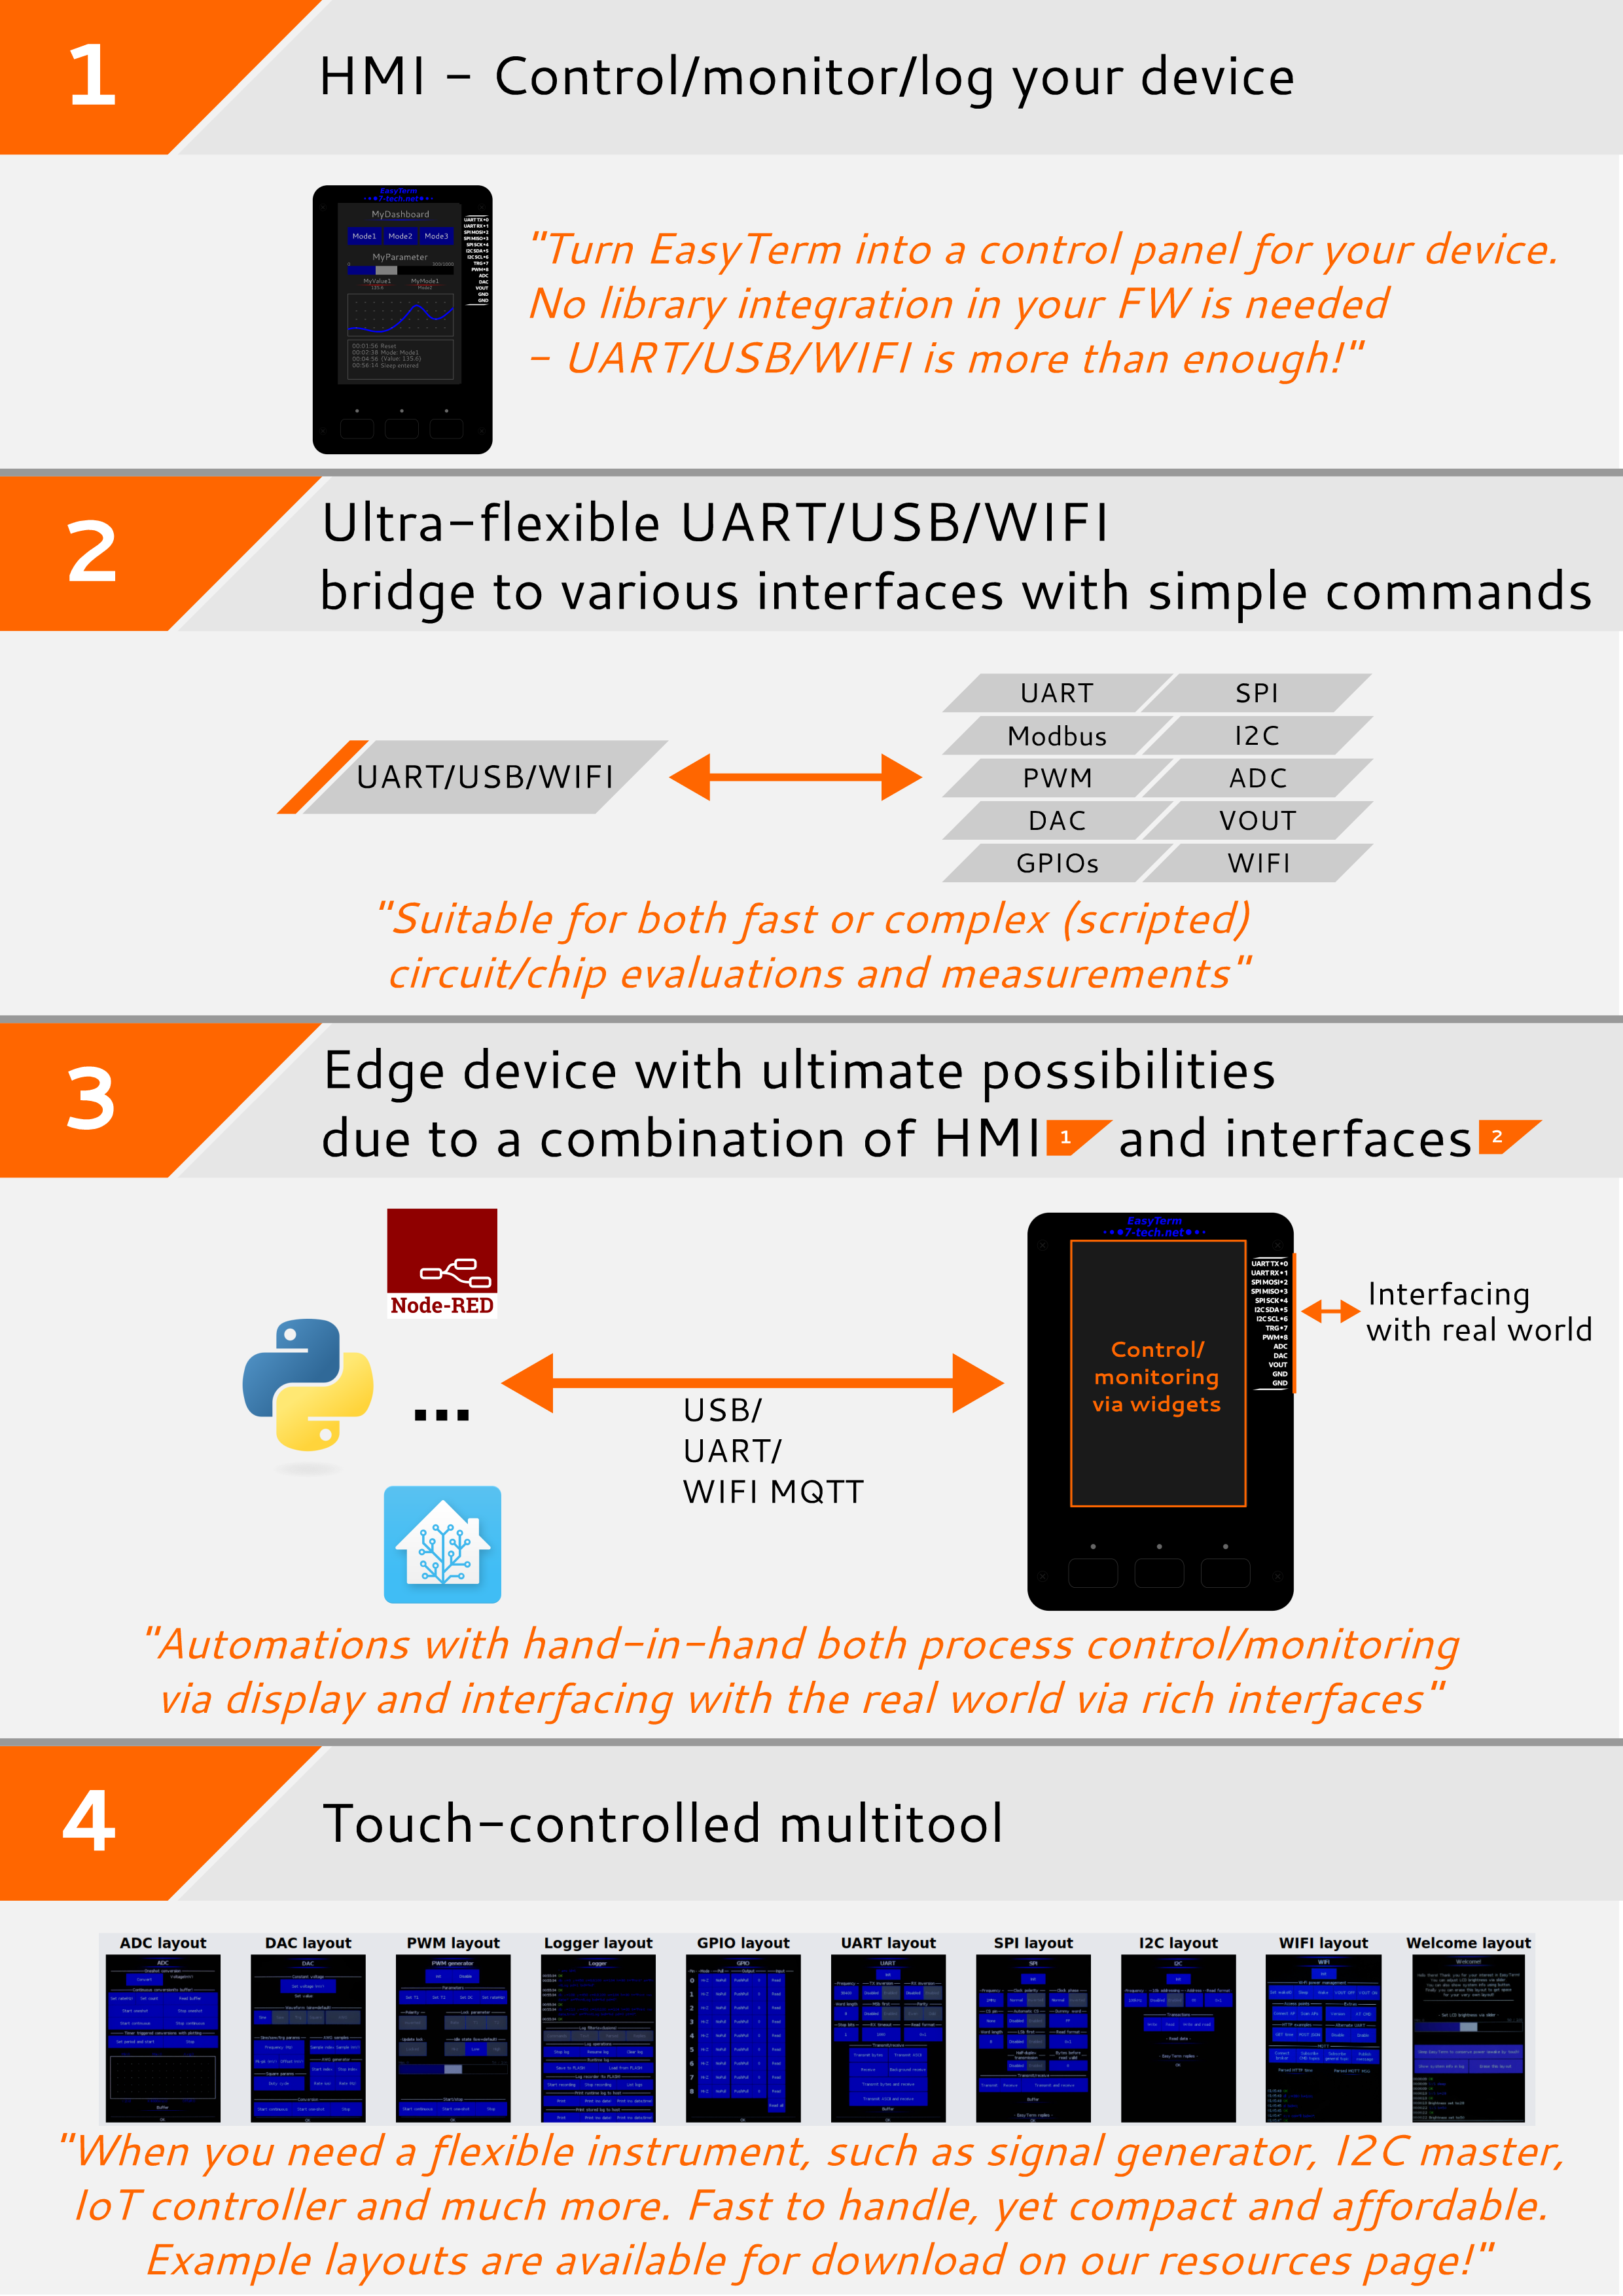
How to control EasyTerm?
EasyTerm is controlled via a simple text protocol through USB port, UART interface (typically via a PC, SBC like Raspberry Pi, or various embedded devices), over the internet using the new WIFI module (sold separately) or by touch interaction by using specific GUI widgets. For maximum comfort and efficiency, there is no need to manually compose commands according to the manual or learn the API—you can use our CmdBuilder application and just fill a few forms (you can try immediately here).
And here lies the essence of the whole thing - you don't have to transmit commands each time - you can just for example transmit a command to display a button with "action" parameter string being set to your frequently transmitted command. Next time, just touch the button and the command is executed as it was received externally. That's the core of our example layouts and it is the core of its flexibility and customizability. This "action" parameter string may have special "placeholders" like "%d" or "%s" to allow user to adjust (fill) part of commands. Numerical/text keypad is then invoked for user to adjust command. Example in "Command <-> GUI widget integration example" below. You can obviously store displayed "layout" to memory.
What can you do with EasyTerm?
A picture worth a thousand words is here.
With a simple text command, you can, for example:
- Operate integrated interfaces - such as generating an analog or PWM signal, converting voltage, reading a register via I2C...
- Display graphical widgets - such as a slider for setting the frequency of a generated signal or for composing a message for a connected user device according to its API, filling in the parameter based on the slider position.
- Log communication of connected devices and device behavior - log records in a widget supporting touch gestures and writing to FLASH memory.
- Control connected user devices - by composing messages via slider, keypad, button or checkbox widgets according to user device API. Or use it as a simple WIFI MQTT/UART bridge (WIFI module needed).
- Parse messages from connected devices - visualize parsed (extracted) data using form widgets, graphs, and logging windows.
Need a control/monitoring panel for your device?
No library or complex connections needed - Even a dollar-cheap MCU with UART can have its own rich control panel by using EasyTerm. No library integration needed - just EasyTerm and a few text-commands sent by MCU's UART to EasyTerm (for example when your device powers-up).
Speed - You can have your control/monitoring panel ready in few minutes thanks to cmdBuilder app.
Sharing EasyTerm - You can also have multiple devices - each sending different set of commands. Thus you can reuse EasyTerm and each device will present its own GUI layout to EasyTerm.
Storing layouts - Commands displaying widgets could have been sent before by a device other than your MCU (for example by PC) and whole layout of widgets could have been stored in EasyTerm memory by using specific command (e.g. "SaveLayout").
Displayed widgets can be used to control your device via its API or parse your device messages and render its contents on display. Your MCU can also send commands to control other aspects of EasyTerm (such as its I/Os, change its behavior etc.) and use it as I/O interface expander.
Want to automate?
Interesting possibilities can also be achieved in the field of automation.
Autonomous simple automations - From FW version 3.0.0 you can upload Python script to EasyTerm and perform simple logic in-device. You can display widgets conditionally or perform various other actions.
Complex and comfortably modifiable automations - Due to the simple API, a wide range of functions can be realized, for example, through visual programming with Node-RED. With the new WIFI module (sold separately), commands can be sent over WIFI using MQTT. Your Node-RED instance will contain the logic of your automation and send commands conditionally to EasyTerm and process its replies. You are just adjusting Node-RED logic in browser as needed without need of any re-programming or need to have EasyTerm near you PC.
Missing a bridge or multitool?
Rich interfaces and simple commands give you a wide range of possibilities.
Just send a command via USB, UART, or WIFI (use CmdBuilder to speed up command creation) to control various interfaces.
Do you use a specific command frequently? Assign it to a displayed button and simply press it whenever needed.
Example layouts can be found HERE – in the "Example Layouts" tab. Copy the provided set of commands into your favorite terminal application or CmdBuilder, send them, and the layout will appear instantly.
Command <-> GUI widget integration example
By sending the command DAC v=2000 , for example, you can generate a voltage of 2V at the DAC output. However, commands can also be used as actions for graphical widgets, allowing EasyTerm to automatically compose commands based on user interaction. For example, you can display a slider configured to perform the action DAC v=%d . Moving the slider generates the appropriate voltage (the %d placeholder is replaced by the value corresponding to the slider's position). Similarly, connected user devices can be controlled—if you have a device whose API allows setting any parameter (e.g., via the message ParameterA:XY), you can set the slider widget "action" in the format ParameterA:%d to adjust this parameter via the slider. Using a button widget will invoke numeric graphical keyboard instead. The %s placeholder can be used with an alphanumeric keyboard.
Similarly, you can monitor various values sent through messages from user devices—if a device sends messages like Status: off, by setting the parsing mask for the form in the format "Status: %s", the string "off" (or anything else matching the parsing mask) will be displayed in the form after receiving this message.
With Python scripting, transmitted and received data can be formatted to or from even complex data structures.
With this principle, we have prepared a series of demonstrative "example" layouts for you, which will quickly turn EasyTerm into a touch-controlled signal generator, logger, I2C bus master, and much more (see HERE - Example Layouts tab).
This device is so flexible that for your comfort, we recommend watching the following videos. All information is also available in the manual (EN) HERE.
Command showcase - "compact" and "self-documenting" format
| Set GPIO 5 to output mode and set state to logic 1 |
| G5 m=o os=1 |
| G5 mode=output outputState=1 |
| Set I2C address to 0x12 and perform write operation of 0x12 0x34 na 0x12 |
| I2C i=1 a=12 wr=1234 |
| I2C initialized=1 address=12 wr=1234 |
| Generate sine of frequency 12kHz and amplitude of 1V |
| DAC p=sin f=12kHz a=1000 cc=1 |
|
DAC pattern=sine frequency=12kHz amplitude=1000
continuousConversion=1
|
| Display slider that generates PWM signal of set duty cycle |
| ds x=10 w=300 h=40 a="PWM i=1 dc=%d cc=1" |
|
displaySlider x=10 width=300 height=40 action="PWM initialized=1 dutyCycle=%d
contnuousConversion=1"
|
| Perform ADC voltage conversion periodically each 1s |
| tim a="ADC v=?" p=1000 s=1 |
| timer action="ADC voltage=?" period=1000 state=1 |
| Display form with parsed-out ADC conversion results |
| df pm="ADC v=%d\r\n" |
| displayForm parseMask="ADC v=%d\r\n" |
Written about EasyTerm


